

How To Update Windows 98 To Xp Free
This chapter is from the book
Upgrading from a Previous Version of Windows to Windows XP Professional person
Upgrade paths from previous Windows versions depend on the operating organization version currently installed. Table 3.1 lists the available upgrade paths for older operating systems.
Tabular array 3.ane Upgrading Older Operating Systems to Windows XP Professional
| Operating System | Upgrade Path |
| Windows 98 Windows Me Windows NT 4.0 Workstation Windows 2000 Professional | Tin can be upgraded directly to Windows XP Professional. |
| Windows 3.1x Windows 95 | Upgrade to Windows 98, then upgrade to Windows XP Professional. |
| Windows NT three.10 Workstation | Upgrade to Windows NT 4.0 Workstation, and then upgrade to Windows XP Professional |
| Windows NT Server | Cannot be upgraded. You need to perform a clean installation of |
| Windows 2000 Server | Windows XP Professional. |
| Not-Windows operating systems (Unix, Linux, Os/2) | Cannot be upgraded. You need to perform a make clean installation of Windows XP Professional person. |
Preparing a Reckoner to See Upgrade Requirements
Objective: Upgrade from a previous version of Windows to Windows XP Professional person.
-
Set a computer to meet upgrade requirements.
In addition to running one of the supported versions of Windows mentioned hither, a computer to be upgraded to Windows XP Professional person must encounter the hardware requirements outlined in Affiliate 1, "Manually Installing Windows XP Professional." In add-on, all hardware components should be found in the Windows Catalog (http://world wide web.microsoft.com/windows/itemize/), which is replacing the Hardware Compatibility List (HCL) for Windows XP and Windows Server 2003. Older software applications also may not exist uniform with Windows XP Professional. Such applications may need to be upgraded or replaced to piece of work properly after you have upgraded your operating system. Review the information provided in Chapter 1 when preparing your computers for upgrading to Windows XP Professional.
Testing System Compatibility
Microsoft includes a compatibility tool on the Windows XP CD-ROM that generates reports describing hardware and software components that may not be uniform with Windows XP. This report identifies any hardware or software problems associated with the computer to be upgraded.
Step past Step iii.ane shows you lot how to obtain a system compatibility report from the figurer to exist upgraded.
STEP BY STEP
3.1 Checking System Compatibility
-
Insert the Windows XP Professional person CD-ROM.
-
When the Welcome to Microsoft Windows XP screen appears, select Bank check Organisation Compatibility.
-
Select Bank check My System Automatically.
-
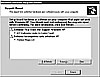
The compatibility program provides ii choices, every bit shown in Figure 3.1. If you are connected to the Internet you should select Yes, Download the Updated Setup Files to ensure that you are checking compatibility against the latest version of Windows. Otherwise, click No, Skip This Step and Continue Installing Windows, and then click Next.
Effigy 3.ane If you are connected to the Internet, y'all should choose to download the updated files earlier preparing your compatibility report.
-
If yous have so called, Dynamic Update connects to Microsoft, downloads software, and updates Setup. Click Side by side to go along.
-
The Preparing an Upgrade Written report screen charts the progress of study creation and displays the location of the report file (unremarkably C:\WINDOWS\Upgrade.txt or C:\WINNT\Upgrade.txt). This may take several minutes.
-
The Microsoft Windows Upgrade Advisor displays a window indicating what items may be incompatible with Windows XP Professional person (meet Figure 3.2). To open up the report file and brandish information about incompatible items, click Full Details.
-
Click Finish and exit the Welcome window.
Effigy 3.2 The Upgrade Written report window informs you of any hardware or software that may exist incompatible with Windows XP.
Additional Preparatory Tasks
Before you lot upgrade the calculator to Windows XP Professional, you should perform several additional tasks. The following tasks depend on the operating organization currently installed on the computer, and include the following:
-
Check the BIOS manufacturer's website for any available BIOS upgrades, and upgrade the computer'southward BIOS to the latest available functional version if necessary. You should perform this step before a clean install or an upgrade to Windows XP.
-
Browse and eliminate any viruses from the computer, using an antivirus plan that has been updated with the latest antivirus signatures. You should and then remove or disable the antivirus programme because it may interfere with the upgrade process. In addition, you should use a third-party program to browse for and remove malicious software (malware).
-
Install whatsoever upgrade packs that may be required to render older software applications compatible with Windows XP. Consult software manufacturers for details.
-
If y'all are running Windows 98 or Windows Me and used applications such equally DriveSpace or DoubleSpace to compress whatever partitions, you should uncompress these partitions and remove the compression software. However, you exercise not need to uncompress partitions that are compressed with Windows NT or Windows 2000 file compression.
-
If you are running Windows NT 4.0 and have created any volume sets or stripe sets, support their contents and remove these sets before you upgrade to Windows XP. If you are running Windows 2000 and take like disk configurations on basic disks, convert these disks to dynamic configuration. Windows XP does not back up volume sets or stripe sets on basic disks. For more data, refer to Affiliate 7, "Implementing, Managing, Monitoring, and Troubleshooting Hardware Devices."
Upgrading the Computer to Windows XP Professional
Later on you take checked system compatibility and performed all tasks required to fix your computer for upgrading, you are set to proceed. The upgrade takes identify in a like way to a new installation, except that answers to some questions asked by the setup sorcerer are taken from the current installation. Stride by Step 3.2 shows you how to upgrade a Windows 98 or Me computer to Windows XP Professional.
STEP By Stride
iii.2 Upgrading to Windows XP Professional
-
If it is not in the drive from the compatibility check process, insert the Windows XP Professional CD-ROM.
-
When the Welcome to Microsoft Windows XP screen appears, select Install Windows XP.
-
On the Welcome to Windows Setup screen (see Figure 3.3), select Upgrade (Recommended) and and so click Next.
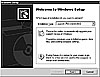
Figure 3.iii The Welcome to Windows Setup screen enables you lot to upgrade Windows or perform a new installation.
-
Accept the license understanding and and so click Side by side.
-
Type the production fundamental in the spaces provided and then click Next.
-
On the Upgrade Report screen (see Effigy 3.iv) (displayed when upgrading from Windows 98 or Windows Me), leave the default selected and and so click Next.
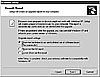
Figure 3.4 The Upgrade Report screen describes items that may be incompatible with the upgrade to Windows XP.
-
Windows Setup displays the Go Updated Setup Files screen. If y'all are continued to the Cyberspace, select Yes, Download the Updated Setup Files (Recommended) option. Otherwise, select No, Skip This Step, and continue installing Windows. Click Next.
-
If yous have selected the Yeah pick, Setup downloads updated files from Microsoft and analyzes the figurer. Setup next copies installation files and restarts the estimator.
-
Printing Enter to accept the default pick from the boot menu (Windows XP Professional person Setup). Windows XP Setup gain in like fashion to that described in Chapter 1, but only asks for any information it cannot call up from the previous Windows installation.
-
After installation has completed and the computer has rebooted, the Welcome to Microsoft Windows screen appears. Click Next and follow the instructions provided, and provide a countersign when requested.
Uninstalling Windows XP Professional
If you have upgraded a Windows 98 or Windows Me calculator to Windows XP Professional person and subsequently make up one's mind to revert to the previous operating system, it is possible to uninstall Windows XP. The uninstallation process restores your previous operating organization without irresolute whatsoever files you have created while running Windows XP. However, applications that were installed or modified while Windows XP was running may need to exist reinstalled later. Step by Step 3.iii shows you how.
Step Past STEP
iii.3 Uninstalling Windows XP Professional
-
Click Get-go, Command Panel, Add together or Remove Programs.
-
If Uninstall is available, the Add or Remove Programs dialog box will contain a Windows XP Uninstall entry, as shown in Figure 3.5. Select this entry and click Modify/Remove.
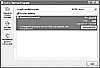
Effigy 3.v If you upgraded to Windows XP from Windows 98 or Windows Me and did not convert to the NTFS file system, the Add together or Remove Programs dialog box contains a Windows XP Uninstall entry.
-
In the Uninstall Windows XP dialog box that opens, select Uninstall Windows XP and then click Keep.
-
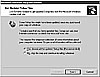
If any programs accept been modified since you upgraded to Windows XP, a Windows XP Uninstall dialog box volition inform you of the changes (see Figure three.6). Click Go along to proceed.
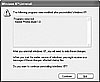
Figure 3.6 You are informed of modifications made since Windows XP was installed.
-
Another message box confirms that you want to restore the previous operating system. Click Yes to uninstall Windows XP and revert to Windows 98 or Me.
-
Windows shuts down and the uninstall proceeds. This process takes several minutes. During the uninstall process, you are informed that if yous installed programs after upgrading to Windows XP, you may need to reinstall them.
-
When the uninstall procedure is consummate, the calculator reboots once more and restores Windows 98 or Windows Me.
| Operating System | Number of Computers |
| Windows for Workgroups 3.11 | 4 |
| Windows 95 | xv |
| Windows 98 | 50 |
| MS-DOS | 3 |
| Windows NT 3.v Workstation | 2 |
| Windows NT iii.51 Workstation | 23 |
| Windows NT 4.0 Workstation | 38 |
| Windows 2000 Professional | 76 |
Your task is to upgrade all these computers to Windows XP Professional by performing as few steps as possible. If possible, you must not remove whatever user settings, data, or applications from whatever of these computers. Draw up a plan for upgrading these computers while adhering to these specifications.
Try to complete this exercise on your own, list your conclusions on a canvas of paper. After you have completed the exercise, compare your results to those given here.
-
You can upgrade all computers running Windows 98, Windows NT 4.0 Workstation, and Windows 2000 Professional directly to Windows XP Professional. This involves a total of 164 computers.
-
Yous must upgrade computers running Windows 3.1x or Windows 95 to Windows 98 first. You can then upgrade these computers to Windows XP Professional. This involves a total of 19 computers.
-
You must upgrade computers running Windows NT 3.51 or earlier to Windows NT 4.0 first. Y'all tin can and then upgrade these computers to Windows XP Professional. This involves a total of 25 computers.
-
Yous must install Windows XP Professional as a clean installation on the 3 computers that run only MS-DOS.
Alternatively, you tin upgrade computers running either Windows 95 or Windows NT three.51 to Windows 2000 Professional person and and so to Windows XP Professional person. However, this upgrade path is not available for the older Windows versions specified in this practise.
Migrating Existing User Environments to a New Installation
Objective: Upgrade from a previous version of Windows to Windows XP Professional.
-
Drift existing user environments to a new installation.
Windows XP Professional includes the post-obit 2 tools that assistance administrators and users in migrating awarding settings and data files to a new computer running Windows XP.
-
User State Migration Tool (USMT)—Designed for administrators who are deploying big numbers of Windows XP Professional person computers in a corporate setting.
-
Files and Settings Transfer Wizard—Designed for users in home or pocket-sized business environments that need to drift files and settings on a small number of computers.
User State Migration Tool
The USMT enables y'all to quickly and easily transfer user files and settings when deploying new computers to a large number of users. It can transfer files and settings from source computers running Windows 95, Windows 98, Windows Me, Windows NT 4.0, or Windows 2000 to destination computers containing a clean installation of Windows XP Professional. This tool reduces the cost of computer deployments by addressing the post-obit issues:
-
Technician time associated with migration
-
Lost employee productivity searching for missing files and other data
-
Lost employee productivity and aid desk calls associated with configuring the desktop
-
Reduced time spent by employees on condign familiar with the new operating system
-
Improved employee satisfaction with the migration experience
USMT consists of two executable files, Scanstate.exe and Loadstate.exe, and several migration data files, including Migapp.inf, Miguser.inf, Migsys.inf, and Sysfiles.inf. Scanstate.exe is used to collect user data and files based on settings in the .inf files, and Loadstate.exe is used to place this information on a new Windows XP computer. These files are all located in the Valueadd\Msft\Usmt folder on the Windows XP Professional CD-ROM.
By default, USMT migrates the My Documents, My Pictures, Desktop, Favorites, and Cookies folders. USMT too migrates settings establish in settings groups such equally Internet Explorer, Outlook and Outlook Express, punch-up connections, phone and modem options, accessibility settings, screen savers, fonts, folder options, network drives and printers, and other Control Panel settings such equally sounds, mouse, keyboard, taskbar, and regional settings. You can modify the prepare of data collected by USMT by editing the information found in the .inf files.
To transfer files and settings by means of the USMT, you run Scanstate.exe on the source computer to collect the data to be migrated and transfer it to a shared folder on a server to which both the source and destination computers have access. And so y'all run Loadstate.exe on the destination computer to identify the collected data on that computer. You can employ a script to automate this procedure when migrating multiple users.
Preparation of the server involves the creation and sharing of several folders. Follow Footstep by Step 3.4 to complete this process.
Pace Past Pace
3.4 Preparing the Server for the Transfer Procedure
-
At the server, create and share a binder named USMT. Configure this folder with the Read permission for the migrating user and at least the Change permission for the local ambassador at the destination estimator.
-
Create 2 subfolders named Scan and Load in the USMT shared binder.
-
Create and share a folder named MigStore. Configure this folder with the Change permission for both the migrating user and the local ambassador at the destination computer.
-
Re-create Scanstate.exe and all .dll and .inf files from the Valueadd\Msft\Usmt folder on the Windows XP Professional CD-ROM to the USMT\Scan folder.
-
Copy Loadstate.exe, Miguser.inf, and all .dll files from the Valueadd\Msft\Usmt folder on the Windows XP Professional CD-ROM to the USMT\Load folder.
Having prepared the server for the transfer procedure, you can at present scan source computers to collect their data and settings. Step by Step 3.v shows y'all how.
STEP BY Stride
3.5 Collecting Data and Settings from the Source Figurer
-
Log on to the source computer as the migrating user.
-
Map a drive to the USMT share on the server.
-
Start a command prompt and navigate to the Scan folder on the mapped drive.
-
Blazon the following command:
scanstate /i:migapp.inf /i:migsys.inf /i:migfiles.inf /i:sysfiles.inf \\server\MigStore
where server is the name of the server used in the process.
Now you lot tin can place the nerveless information on the destination figurer by following the procedure outlined in Step by Step three.6.
Pace BY Footstep
three.6 Placing the Collected Data on the Destination Figurer
-
Log on to the destination computer equally the local ambassador. A standard user cannot run the Loadstate tool, equally described in Microsoft Cognition Base article 870624.
-
Click Start, Control Panel, User Accounts. Ensure that the migrating user does not have a user business relationship listed; if such an account exists, delete it and confirm that you want to delete the user's files.
-
Map a drive to the USMT share on the server.
-
Start a command prompt and navigate to the Load binder on the mapped bulldoze.
-
Blazon the following command:
loadstate /i:miguser.inf \\server\MigStore
-
When the procedure completes, log off and log on equally the migrating user.
-
Verify that the files and settings have been transferred properly. The classic desktop should appear considering the quondam user shell is contained in the settings transferred by USMT.
Files and Settings Transfer Sorcerer
The Files and Settings Transfer Wizard enables you lot to transfer files, folders, and settings belonging to a user to a new computer or an existing figurer on which a make clean installation of Windows XP Professional exists. It is a simple means of transferring these settings when just a few computers are involved, or when users are individually responsible for migrating information to a new computer. It is automatically installed on Windows XP Professional computers during operating system installation.
This wizard operates by creating a Migration Magician Program disk, using this disk to prepare data on the source (sometime) figurer for transfer, and then transferring them to the destination (new) computer. To perform this procedure, y'all need to have the following items available:
-
Removable media such as CD-R disks to store the migrated information. You tin as well employ a shared folder on a server or a serial cable to connect the two computers directly.
-
A blank floppy disk for the sorcerer, or the Windows XP Professional CD-ROM.
-
The user name and password of the user whose data is being migrated.
To run the Files and Settings Transfer Magician, you start the wizard at the destination reckoner and create a wizard floppy disk. And then you take this disk to the source estimator and migrate the information to removable media or a shared folder. Finally, you render to the destination computer and import the migrated data. Stride past Step 3.7 provides a detailed procedure.
Stride BY STEP
three.7 Using the Files and Settings Transfer Magician to Transfer Information to a New Computer
-
At the destination estimator, click Beginning, All Programs, Accessories, Organisation Tools, Files and Settings Transfer Wizard.
-
The sorcerer displays a welcome screen that describes its actions. Click Side by side.
-
The magician asks whether yous are at the new computer or the one-time one. Ensure that the New Computer option is selected, and then click Next.
-
To create a floppy disk for running the wizard on the source estimator, select the I Want to Create a Wizard Deejay in the Following Drive option, and select the drive letter of your floppy bulldoze. Encounter Figure 3.7.
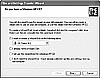
Figure three.7 The Files and Settings Transfer Wizard provides several options for collecting data from the sometime reckoner.
-
Insert a blank, formatted floppy into the selected drive, and then click OK. When this step is completed, the sorcerer instructs you lot to become to the old computer. Exit this screen of the wizard visible on the new computer.
-
Go to the source (old) computer, insert the floppy disk, and type a:fastwiz in the Run dialog box. The sorcerer copies files and displays the welcome screen.
-
Click Next to display the Select a Transfer Method screen.
-
Select the media blazon being used for the transfer, and and then click Next to brandish the What Do You Want to Transfer screen.
-
Select the types of data (files, settings, or both) to be transferred. As shown in Effigy 3.eight, the data to be transferred is displayed on the right side of this screen. Click Next.

Figure 3.eight The magician provides several options for data transfer and displays a list of items to exist transferred.
-
The wizard collects the information to be transferred. This may take several minutes. When information collection is consummate, it displays a bulletin box asking for the kickoff disk.
-
If using removable media such as recordable CDs or Nothing disks, insert the first deejay and so click Next. The wizard transfers information to the media and asks for additional disks equally required.
-
When the magician displays a completion screen, click Finish and render to the new reckoner.
-
At the new computer, click Next on the screen you received in step v of this procedure.
-
Specify the location of the items being transferred, and and so click Next.
-
If using removable media, insert the first disk so click Next.
-
Insert additional disks as required until the completion screen appears.
-
Click Finish, and then click Yes to log off and utilize the settings.
Source: https://www.pearsonitcertification.com/articles/article.aspx?p=381919&seqNum=2
Posted by: russelloblem1976.blogspot.com
0 Response to "How To Update Windows 98 To Xp Free"
Post a Comment